

That’s where the state management comes in.
State management is a way to store data, reuse it in many places and dynamically update it in the background — in simple words, it manages the current value of your data. There are many libraries that provide store management for our applications. NgRx is one of them.
Basic Concepts in NgRx
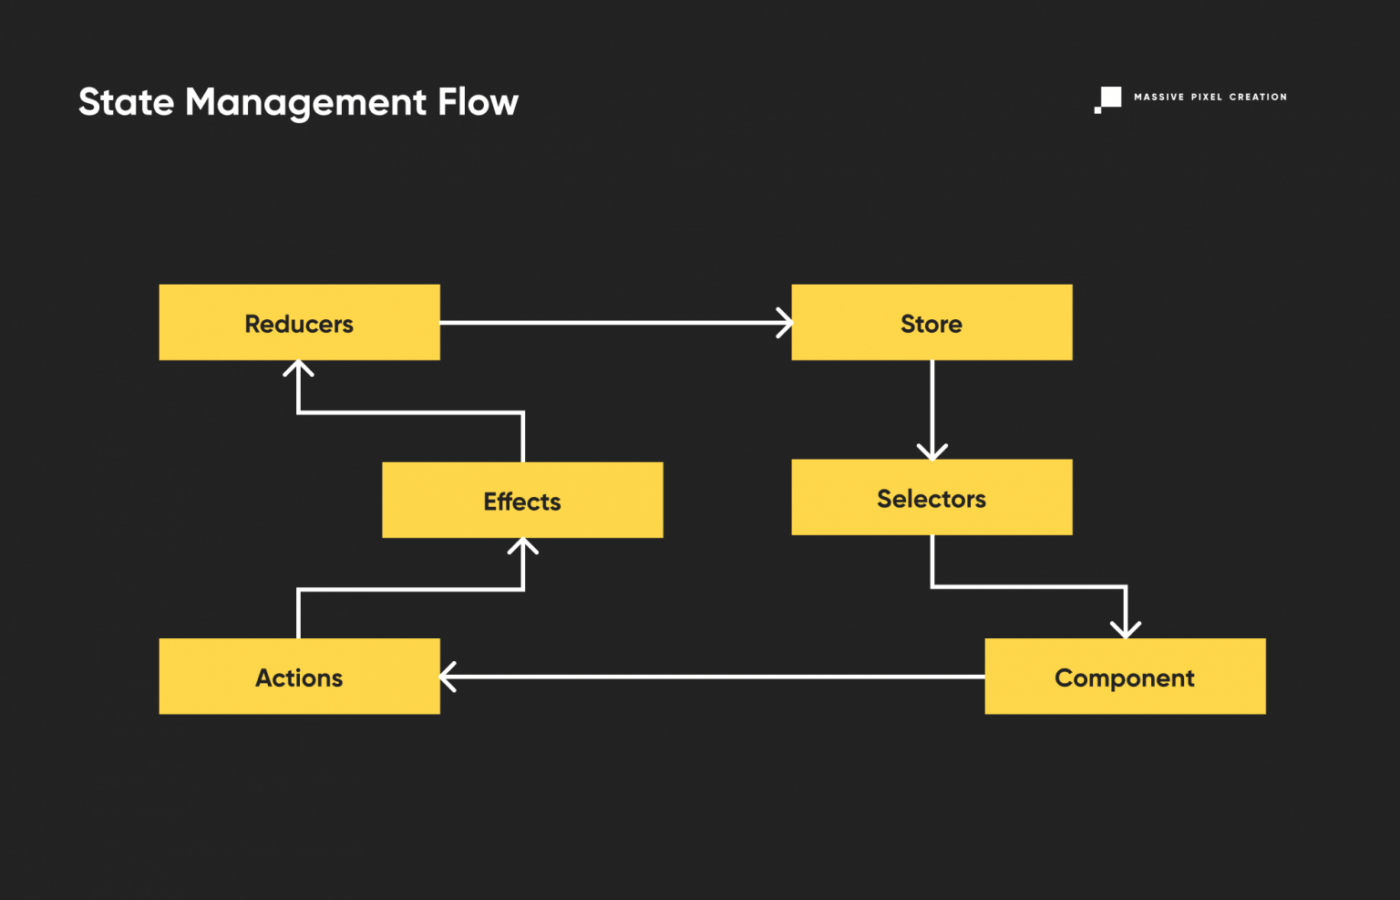
NgRx is essentially a group of libraries powering state management for Angular applications. They facilitate handling state and are enforcing unidirectional data flow. They were also ‘inspired’ by Redux (developed for React). The most important concepts in NgRx are:
- Store,
- Actions,
- Reducers,
- Effects,
- Selectors.
NgRx Store is like a container where the data can be stored. The store can contain any data or you can design an interface for incoming data which is actually the recommended option. The stored data is called state. There are two important properties of the store that you should keep in mind:
- Store is read–only — you can’t make changes directly to your store. Instead, you dispatch the action to trigger some changes.
- Single instance — there’s only one instance of the same store.
Actions are functions to trigger some operations to be run on data. It contains two properties:
- type — the name of the action that usually serves as the description of what it does in the format: [what is changing] — what’s exactly happening. For example, ‘[Book list] Load next page’
- payload — all the data we want to pass on to effects or reducers. Not all actions need a payload.
Reducers are pure functions that are triggered by effects. If there are no effects, then it’s triggered directly by the actions. Reducers return the new state which is a combination of an old state and new values. So logically, the reducer accepts two arguments:
- old state,
- payload.
Effects are special functions that create side effects before the reducer is called. Typically, it’s a call to an external API. They are assigned to particular actions and can use their payload.
Selectors provide ways to read data from the store. It should not be all information from the store but rather just a piece of information that we really need in the given concept.
Pros and Cons of Using NgRx
Like everything in the development world, there are various advantages and disadvantages to using NgRx. The most significant benefits are:
- The data flow in the application is clear,
- The data is in an organized shape, easily accessible through the whole application,
- Your components are simpler due to logic delegation to reducers and effects,
- You can split actions and effects over multiple files and modules,
- Thanks to advanced debug extensions for NgRx, debugging is easy.
- It’s easy to avoid bugs due to the immutability of state at a component level.
And then there are the drawbacks:
- NgRx has a steep learning curve. In the beginning, many concepts will be challenging. But once you understand the main principles, you’ll most probably be able to progress quickly and master even the most advanced features,
- Good knowledge of RxJS is necessary,
- It may be hard to find proper names for actions and effects,
- Using NgRx for everything is overkill. If you’re dealing with small and uncomplicated data, simply fetch it directly.
When It’s Recommended to use NgRx
In general, it’s a good practice to use state management whenever we have a state. What does it mean to have a state? I will define it as having data that is loaded asynchronously and is used in many different places.
Let’s see the flow of the state management.
If we need data just in one component and in one place, then using the state management can be an overhead (in my opinion, of course).
The SHARI Principles
There’s also the official approach to this problem, called the SHARI principle, which helps decide whether you should use the NgRx store.
- Shared: is your state accessed by a lot of components and services?
- Hydrated: is your state persisted and rehydrated from external storage?
- Available: do you need your state to be available when re–entering routes?
- Retrieved: does your state have to be retrieved with a side–effect?
- Impacted: is your state impacted by actions from other sources?
If you answered “yes” to the questions above, consider using NgRx for your project.
Setting up the application with state management
To illustrate how to build an Angular application with state management, we’ll create a new product. It will be a simple application to manage a bookshop. There are steps that we need to perform to do it:
- Create the Angular project and simple UI (I will not describe it here in detail),
- Install the library,
- Create State and initial values,
- Create Actions,
- Create Effects,
- Create Reducers,
- Create Selectors,
- Use NgRx store in components.
Installation of the library
We are going to use Angular CLI to install NgRx libraries. Use the following command:
npm install @ngrx/core @ngrx/store @ngrx/effects @ngrx/store-devtools --saveExcept for standard things, we added here store-devtools to enable powerful tooling for debugging.
Let’s create a file structure for the store. It should consist of five directories: actions, effects, reducers, selectors, and state.
The folder structure is a representation of all state management elements. For now, all directories are empty.
Create state and initial values
We are going to have just one store in our application so let’s create it. First of all, we should create an interface to see how the data structure should look like. The file is called book.state.ts and created in the state directory.
export const BOOKS_FEATURE_KEY = 'books';
export interface BookState {
  books: Book[];
  loaded: boolean;
  error?: string | null;
}

export const initialBookState: BookState = {
  books: [],
  loaded: false,
  error: null,
};
What have we done here?
- We defined what would be inside the store.
- We defined the initial values.
- We defined a feature key for a store. We can treat it as a store name.
At the moment it doesn’t do anything, but I always start creating a new store by building an interface for it. It should help you acknowledge whether the data you want to put into the store is well–crafted or not.
If data is big and you need a lot of properties in the interface to access it the right way, you might want to use more than one store. On the other hand, if data from a newly created store always goes with data from another store, it’d probably be better to add it there.
Create actions
Once we’ve created a schema for data, we can create actions. They should describe all operations able to change the state. The most obvious action is to load books, but I added two extra actions as well: getting a random book and adding a new book. We could have also added more actions like remove, edit, or sort, but in order to keep it simple, we’ll implement only these three. The file is called book.actions.ts and it’s created in the actions directory.
export enum BookActionsNames {
  Init = '[Book] Init',
  LoadBooks = '[Book] Load Books',
  LoadBooksSuccess = '[Book] Load Books Success',
  LoadBooksFailure = '[Book] Load Books Failure',
  GetRandomBook = '[Book] Get Random Book',
  GetRandomBookSuccess = '[Book] Get Random Book Success',
  GetRandomBookFailure = '[Book] Get Random Book Failure',
  AddBook = '[Book] Get Random Book',
  AddBookSuccess = '[Book] Get Random Book Success',
  AddBookFailure = '[Book] Get Random Book Failure',
}
export const Init = createAction(BookActionsNames.Init);

export const LoadBooks = createAction(BookActionsNames.LoadBooks);

export const LoadBooksSuccess = createAction(
  BookActionsNames.LoadBooksSuccess,
  props<{ data: Book[] }>()
);

export const LoadBooksFailure = createAction(
  BookActionsNames.LoadBooksFailure,
  props<{ error: string | null }>()
);

export const GetRandomBook =
createAction(BookActionsNames.GetRandomBook);

export const GetRandomBookSuccess = createAction(
  BookActionsNames.GetRandomBookSuccess,
  props<{ data: Book[] }>()
);

export const GetRandomBookFailure = createAction(
  BookActionsNames.GetRandomBookFailure,
  props<{ error: string | null }>()
);

export const AddBook = createAction(
  BookActionsNames.AddBook,
  props<{ data: Book }>()
);

export const AddBookSuccess = createAction(
  BookActionsNames.AddBookSuccess,
  props<{ data: Book }>()
);

export const AddBookFailure = createAction(
  BookActionsNames.AddBookFailure,
  props<{ error: string | null }>()
);
There are a few things worth noticing. First of all, names of actions are separated from actions. It’s done to ensure clean code. We’d like to find an action responsible for an operation in the most simple way — by checking where the value of enum is used. All actions names start with an uppercase letter because they’re essentially the instances of a class implementing the Action interface. createAction is a quick way to create it but each of them might be written fully like this:
export class AddBook implements Action {
  public readonly type = BookActions.AddBook;
  constructor(data: Book) {}
}
Create effects
We assume the list of books will be fetched from outside API, so we would need to make an HTTP call to get data. Therefore, we need an effect to do it. In this case, instead of accessing it via HttpClient, we’ll use the hardcoded JSON file. Practically, the only difference between the real situation and this example is the waiting period to get a response. The same applies to adding a book operation. The file is called book.effects.ts and it’s created in the effects directory.
…
import { BookActionsNames, BookActions } from '../actions/book.actions';
import * as bookActions from '../actions/book.actions';
import fakeResponse from '../../data/data.json';
import { Book } from '../state/book.state';
…
@Injectable()
export class BooksEffects {
  constructor(
    private readonly actions$: Actions,
    private readonly http: HttpClient
  ) {}
  public readonly loadBooks$: Observable<any> = createEffect(() => {
    return this.actions$.pipe(
      ofType(BookActionsNames.LoadBooks),
      switchMap(() => of(fakeResponse)),
      map((data: Book[]) => bookActions.LoadBooksSuccess({ data })),
      catchError((error: string | null) =>
        of(bookActions.LoadBooksFailure({ error }))
      )
    );
  });
  public readonly addBook$: Observable<any> = createEffect(() => {
    return this.actions$.pipe(
      ofType(BookActionsNames.AddBook),
      map((data: any) => {
        const book: Book = data.data;
        return bookActions.AddBookSuccess({ data: book });
      }),
      catchError((error: string | null) =>
        of(bookActions.AddBookFailure({ error }))
      )
    );
  });
}
The interesting thing here is the fact that we always dispatch another action from this action. The action BookActionsNames.LoadBooks always results in another action, either BookActionsNames.LoadBooksSuccess or BookActionsNames.LoadBooksFailure. If there are many effects, it would be good to create services for each of them to separate calling to the API and the effect itself.
Create reducers
We use reducers to change the data when we load the book list and we add new books to the collection. If there’s an error, we want to have it in the store, so we have reducers for it as well. The file is called book.reducers.ts and created in the reducers directory.
…
import { initialBookState } from '../state/book.state';
import * as bookActions from '../actions/book.actions';

const booksReducer = createReducer(
  initialBookState,
  on(bookActions.Init, (state) => ({ ...state, loaded: false, error: null })),
  on(bookActions.LoadBooks, (state) => ({
    ...state,
    loaded: false,
    error: null,
  })),
  on(bookActions.LoadBooksSuccess, (state, { data }) => ({
    ...state,
    books: data,
    loaded: true,
    error: null,
  })),
  on(bookActions.LoadBooksFailure, (state, { error }) => ({ ...state, error })),
  on(bookActions.AddBook, (state) => ({
    ...state,
    loaded: false,
    error: null,
  })),
  on(bookActions.AddBookSuccess, (state, { data }) => {
    let books = [...state.books];
    books.push(data);
    return {
      ...state,
      books: books,
      loaded: true,
      error: null,
    };
  }),
  on(bookActions.LoadBooksFailure, (state, { error }) => ({ ...state, error }))
);

export function reducer(state: BookState | undefined, action: Action) {
  return booksReducer(state, action);
}
There’s a function reducer to call our reducers with the current state and action. We use a payload (if it exists) to construct a new state. Even when we want to add a new book to the list, we’re still going to need to replace the old state with the new one.
There is ..state in each new state. It simply prevents us from omitting values that haven’t been changed with this action. If you look carefully, you can easily spot it’s not the case in our example, but still — it doesn’t hurt to have it. When we have big reducers, it’s good to extract them to dedicated files to keep our code easy to read and clean.
Create selectors
Selectors will help you obtain all three properties of the state. The file is called book.selectors.ts and it’s created in the selectors directory.
…
import { BookState, BOOKS_FEATURE_KEY } from '../state/book.state';

export const getBooksState = createFeatureSelector<State>(BOOKS_FEATURE_KEY);

export const getBooksLoaded = createSelector(
  getBooksState,
  (state: BookState) => state.loaded
);

export const getBooksError = createSelector(
  getBooksState,
  (state: BookState) => state.error
);

export const getAllBooks  = createSelector(
  getBooksState,
  (state: BookState) => state.books
);
There’s no magic here. We fetch a whole state and then we rely on it to get specific properties.
Using store in components
When we’ve got all of the above set and ready, we need to think about how to be able to use it in our components. Personally, I’m a big fan of the facade idea. The facade is an injectable service to operate on the store — to send actions or fetch data, to be exact. Let’s create a facade for our store.
…
import { Book, BookState } from './state/book.state';
import * as bookSelectors from './selectors/book.selectors';
import * as bookActions from './actions/book.actions';

@Injectable()
export class BookFacade {
  public readonly loaded$: Observable<boolean> = this.store.pipe(
    select(bookSelectors.getBooksLoaded)
  );
  public readonly allBooks$: Observable<Book[]> = this.store.pipe(
    select(bookSelectors.getAllBooks)
  );

  constructor(private readonly store: Store<BookState>) {}
  public init(): void {
    this.store.dispatch(bookActions.Init());
  }
  public loadBooks(): void {
    this.store.dispatch(bookActions.LoadBooks());
  }
  public addBook(book: Book): void {
    this.store.dispatch(bookActions.AddBook({ data: book }));
  }
}
Finally, we need to import the store in the module. We can do it using forRoot or forFeature. Let’s do it using the latter.
import { BooksEffects } from './store/effects/book.effects';
import { reducer } from './store/reducers/book.reducers';
...
imports: [
    ...
    StoreModule.forRoot({}),
    StoreModule.forFeature(BOOKS_FEATURE_KEY, reducer),
    EffectsModule.forRoot([BooksEffects]),
    !environment.production ? StoreDevtoolsModule.instrument() : []
  ],
providers: [BookFacade]
And that’s it, everything should be working now. Whenever we add a new book to our collection, it’s automatically fetched and the local UI state is updated (but it will be gone after the refresh).
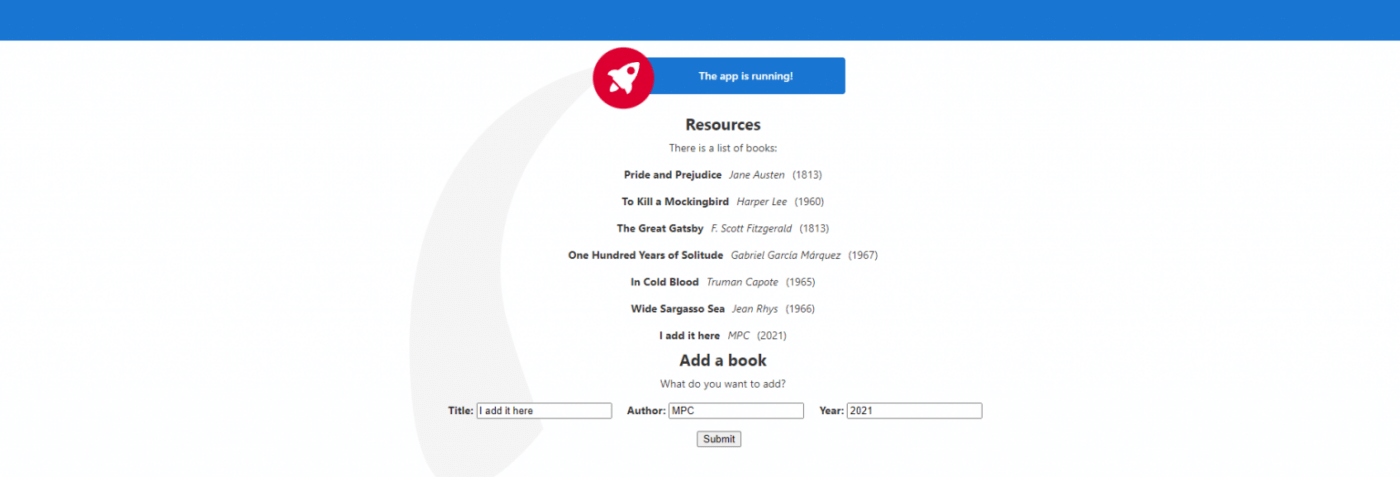
If you’d like to see the app in action, you can download it by clicking over here.
Angular State Management: The Summary
There are a lot of benefits you can reap while managing state using NgRx. Don’t be afraid to experiment! Learning NgRx and state management techniques in–depth can bring you to more advanced store usage like a NgRx store for routing or meta–reducers to track all the changes in the store. It’s a long way to go, but it’s worth it. You’ve done the first step, now it’s time to walk this path alone.
…with a little help from online documentation, of course 🙂