

But you shouldn’t compromise on Angular best practices.
Only they can unlock the full potential of Angular, ensure easy maintenance, growth potential, and code readability of your projects. These practices should be embraced by all developers, so even if you already know (and use) some of them, it’s good to have a reminder.
Let’s create a better working environment for Angular developers!
Use Angular CLI
Angular comes with its own command line. It’s highly recommended to install it and use it as much as possible. Using predefined commands instead of doing everything by hand is incredibly time-saving. For example, making a new Angular project manually would probably take an hour or two (don’t try that unless you’re an absolute masochist). But it can be easily done with just one command:
ng new nameOfTheApplicationAfter that, you can immediately run the application:
ng serveUsing the Command–line Interface tool, you can generate any type of file available for Angular — be it a component, interface, service, or anything else. Also, you can search through official documentation using the CLI. The following command:
ng doc <search keyword>should prompt the opening of a browser with search results for a given keyword on the Angular official page.
The main benefits of using CLI are:
- Saved time,
- Platform independence,
- Effortless configuration while adding new code.
Follow the file naming convention
There’s a clear and logical file naming convention defined by the authors of the Angular framework. It goes:
[name].[role].[extension].
If there is more than one word, you can use kebab-case:
[name].[role-with-a-kebab-case].[extension].
That’s why the default module after you created a new Angular app with CLI, called AppModule, is composed of the following files:
- app.component.html
- app.component.scss
- app.component.spec.ts
- app.component.ts
- app.module.ts.
If you use the CLI to create new files for you, then you will be following the convention automatically. If there’s an extraordinary situation and you need to create files by yourself, then stick to this convention to make life easier for other developers — they will recognize this naming schema at a first glance and have no trouble figuring out what’s going on in the code.
The main benefits of following this convention are:
- Easy recognition of what the file does,
- Searching and grouping concrete files is easy.
Have a clear folder structure
Not only there’s a file naming convention, but also a recommendation for the folder structure. And It’s just as important.
You can see the proper structure below:
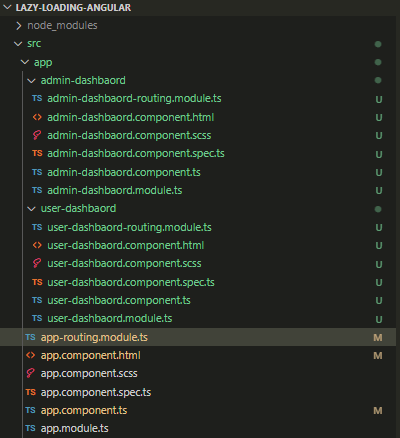
That’s how it may look like after creating some components. The directories are created automatically by the CLI. You can create some extra folders to group it even more, just remember to use clear names.
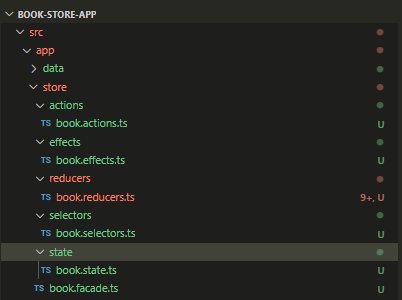
Below, you can see a more complicated structure for a store where all elements are grouped in the directories by their roles.
The main benefits of having a clear folder structure are:
- Easy recognition of where the files responsible for specific features are,
- Higher visibility of code dependencies,
- Searching and grouping concrete files is easy.
Rule of one (one file per object)
It’s a simple rule mentioned on the official Angular page. It says you should have only one object per file. So, for example, don’t put an interface on top of your class. Create a new file to have it there.
It also helps to comply with the single responsibility principle.
The main benefit of having one object per file is a clear indication of what’s inside. This can be a life–saver when working on big projects.
Distinguish variable and class names, dumb and smart components
Let’s look into the files and take something simple — classes, for instance.
The name of the class should follow PascalCase naming convention, for example: AppComponent. The name of class properties and methods should use camelCase, resulting in appName.
The very basic structure in Angular is a component. It’s popular and useful to divide your components into dumb (presentational) and smart (logical) components. The dumb components are responsible for presenting data and they rarely have any logic on their own (if they do, it’s probably related to the UI, not application state), while the smart components take care of performing functions and managing data — sending the relevant data to dump components included.
The benefits of having proper variable and class names and dumb and smart components are:
- Easy recognition of classes and variables by name only,
- Easy recollection of where to change the UI and where to change the logic,
- Easier creation of reusable components.
Use ESLint
Angular 12 doesn’t come with the linter (the plugin that ensures the following of certain code writing rules) but you can easily fix that by running this line:
ng add @angular-eslint/schematicsThen, some modern code editor like Visual Studio Code will automatically lint it for you. Otherwise, you can lint your code with a simple command:
ng lintAfter that, you’re all set to lint your code. It has some good predefined settings but you can configure them however you wish — for example, to set some additional warnings or errors. All the configuration is stored in the .eslintrc.json file.
You can check out the complete list of rules to see what’s included in the recommended settings and what isn’t. Additionally, you can read in–depth explanations for each rule.
The main benefits of using the ESLints are:
- The same code convention is followed throughout the whole Angular application,
- Rules verification in an automated way during the build process,
- Easy updates and additions of new rules to the coding style guide.
Use TypeScript strict mode
Since the version 12 and up, each new project created with the CLI has a TypeScript strict mode enabled by default, so you might not even realize that you’re using it. The strict mode is a set of rules that enforce specific methods of writing code. It contains noImplicitAny, noImplicitThis, strictBindCallApply, strictNullChecks, strictFunctionTypes, strictPropertyInitialization and alwaysStrict. Many of them are self-explanatory and you can turn them on/off in the tsconfig.json file. You can do the same to the whole strict mode by changing this property:
"strict": trueThe main benefit of using TypeScript strict mode is a better–crafted code because of enforced rules.
Break down and reuse your components
During Angular development, it’s easy to create big components with similar logic repeated many times throughout the application. But it’s a much better option to create small, reusable components. You also should keep in mind their dumb and smart versions.
The main benefits of breaking down and reusing your components are:
- Easy maintenance because of small components,
- Saved time because of the reusable components.
Use interfaces
It’s very likely you will operate on some data from the API. It usually has a predefined JSON format. It’s extremely good to have it typed with interfaces instead of using any. The interfaces in Angular allow specifying whether the property is mandatory (by default) or optional (you need to add ? after the property name).
Here’s a simple example:
export interface BookState {

 books: Book[];

 loaded: boolean;

 error?: string | null;

}
The main benefits of using interfaces are:
- Fewer bugs,
- Predictable data that’s easy to operate on.
Use safe navigation operator (also known as optional chaining)
Who has never seen the error ‘cannot read property of undefined’?
Nobody?
Yeah, that’s what I thought.
In many cases, this error is a result of not using a safe navigation operator. It’s a critical error, so when it happens, Angular will not render the component. It can be prevented with a simple construction like this:
objectMayBeUndefined.propertyIt’s equivalent to writing an if, like this:
if(objectMayBeUndefined)

 objectMayBeUndefined.property
In this case, the question mark is called a safe navigation operator.
The main benefits of using a safe navigation operator are:
- No critical errors when the property is not present,
- Reduced number of
ifsin the code, - Easy prediction of what might not be present at the time of execution.
Create index.ts files
If you’re developing a big application, you’ll probably end up exporting and importing a lot of elements into the app. When there’s a lot to export, it’s best to use a single file to accumulate all exports.
The simple index.ts would look like this:
export * from './hero.model.ts';

export * from './hero.service.ts';

export { AppComponent } from './app.component.ts';
You can export the object from the file or use barrel exports.
The main benefit of using an index.ts file is having one–source of truth for what’s being exported.
Rely on OnPush change detection strategy
In order to reflect changes to the state of the application each frontend framework needs some kind of change detection mechanism, and to do it in a performant way that won’t kill the browser, each framework needs to be optimised so that re-renders don’t occur unnecessarily. Angular is no different.
By default, it will react to all of the actions that happen both synchronously and asynchronously. Each change to your @Input (even properties nested somewhere deep inside the object), each event, browser API call (like setTimeout, scroll event etc.), will trigger change detection. It happens because Angular does not know all possible ways that your data can change. It needs to “just work”, so it reacts to everything.
To optimize that, you can opt-in to use OnPush change detection strategy that will greatly reduce the number of re-renders, but can also cause your view to not reflect your current state correctly. When you use OnPush, only changes to your @Inputs (in case of objects, reference to new object must be passed) and Observable emits that are caught by the async pipe trigger change detection. If you need to re-render in other situations, you have to tell Angular to do it by using either markForCheck or detectChanges methods from ChangeDetectorRef.
To start relying on OnPush, a developer has to explicitly indicate when Angular should detect new changes. You can do this by adding a simple line to the component declaration:
@Component({
  selector: 'app-root',
  templateUrl: './app.component.html',
  styleUrls: ['./app.component.scss'],
  changeDetection: ChangeDetectionStrategy.OnPush
})
export class AppComponent {
  …
}
The main benefits of relying on onPush are:
- Increased performance,
- More control over the change detection process.
Don’t use type any
Angular allows you to use a general type any that’s used to match anything. It’s easy to spot — it might result in many errors like property name typos, type mismatch, potential undefined value, etc. For example:
metaData: any;

<div class="card-container">
  <button (click)="addBook()">{{ metaData.numberOfBoks+1 }} books already there</button>
 </div>
Using type any can be especially disastrous for complicated objects that should’ve had their own interface. Also, any doesn’t allow IDE to recognize what’s inside the variable so it can’t help you with useful autocorrect or error highlighting. The easiest way to ensure that any wouldn’t be used is to configure ESLint to take care of it. Otherwise, you can just check manually if it’s not in the code.
The main benefits of not using type any are:
- More self–explanatory code,
- Fewer bugs,
- Easier debugging in case of errors.
Don’t use the scroll event
Events are actions that happen due to user activity on the website — like a clicked button, refreshed page, or an opened new window. You can define your own events but many of them are predefined. You can listen to all possible events to execute a function when triggered.
One of such events is a scroll event. It’s triggered when a user scrolls a website. It means you can easily generate millions of function executions while listening to this event. There are ways to mitigate it like debounce but it’s best to try to avoid it as much as possible.
The main benefit of not using the scroll event is an increase in performance.
Use Built-In Angular Features For DOM Operations
From time to time, you’ve got to manipulate DOM elements in HTML. Because Angular is based on TypeScript, which is a tyYou might find yourself in a situation where you need direct access to DOM elements. Technically, using APIs built directly into the browser will work, but in most cases that is not what you should use.
Fortunately, authors of the framework created their own way to deal with it. The simplest way to use it is to tag the element in the template:
<result-score #winnerResult [result]="result"></result-score>Then, you can refer to this element in the script file:
@ViewChild("winnerResult") winnerResult: WinnerResultComponent;This method allows you to operate from the parent perspective on the child component (in this case, WinnerResultComponent). You’ll most likely want to operate not only on your components but on native elements as well. If you tagged regular HTML element, ViewChild decorator would return ElementRef. To query elements that were projected using , you can use ContentChild decorator instead.
To manipulate or create new elements in the DOM, `Renderer2` should be used unless you know what you are doing. Manipulating elements directly might get your data model and the view out of sync, since it does not trigger change detection. Also, DOM manipulation works only in the browser, so when you use Angular Universal you might encounter problems.
The main benefits of using Angular features for DOM manipulation are:
- Performance increase,
- Easy code maintenance,
Don’t use functions and impure pipes in your HTML template
Angular offers a direct connection between HTML templates and script files. It’s also possible to use functions and pipes. Here’s an example of such a code:
<div class="card-container">
    <strong> {{ title | transform }}: <input type="text" name="title" #title /></strong>
    <strong> {{ author | transform }}: <input type="text" name="author" #author /></strong>
    <strong> {{ year | transform }}: <input type="number" name="year" #year /></strong>
  </div>
  <div class="card-container">
    <button (click)="addBook()">{{ textButton() }}</button>
  </div>
The problem with the functions and impure pipes is connected to the change detection mechanism. When Angular does the change detection, it doesn’t know what exactly has changed so all functions and impure pipes are recalculated — textButton() and | transform in the code above. If there are a lot of them in the template, it might impact the whole Angular application significantly.
The main benefits of not using functions and impure pipes in HTML template are:
- Huge performance increase,
- Better code organization.
Use trackBy in ngFor
ngFor is a standard construction to do loops in the HTML templates. It’s a very comfortable way to operate on the recurring code on many data instances. It works without any issues if your data is static. Otherwise, all elements are updated once data changes, even those that stayed the same. So let’s check this example:
public array: Result[] = [
  { id: 1, result: 123412423 },
  { id: 2, result: 234912423 },
  { id: 3, result: 341242983 }
];
public getIdTracking(index: int, item: Result) {
  return item.id;
}
Now, let’s add a new element to the array with two implementations of ngFor:
<div *ngFor=”let i of array”>
  …
</div>
Here, 4 elements will be evaluated.
<div *ngFor=”let i of array; trackBy: getIdTracking”>
  …
</div>
Here, there’ll be only one element evaluated.
The main benefit of using trackBy in ngFor is increased performance.
Take care of performance with Angular Differs API
Angular Differs API isn’t as popular as it should be. The main idea is to have a clear picture of what has been changed, instead of just the information that the change was made.
Angular Differs API contains two Differs API options:
IterableDiffer, which tracks changes made to the iterable over time and exposes methods to react to these changes,KeyValueDiffers, which tracks changes made to the object over time and exposes methods to react to these changes.
The main benefit of using Angular Differs API is increased performance.
Take advantage of the state management for API calls
Does your app call the API? Are you dealing with asynchronous calls?
I guess the answers are yes and yes.
Then, you definitely need state management. State management is a way to deal with asynchronous actions and keep fetched data in an organized way. There are many ways to do that — for example, by using NgRx.
The main benefits of using the state management are:
- Easy to debug data flow in Angular applications,
- Split between the management of API calls and other code.
Use lazy loading
Usually, big applications contain a lot of routes. It’s a good practice to use lazy loading to load the module for a route that’s actually needed, not for all of them. It’s just one line in the code called loadChildren:
...
 {
    path: 'adminDashboard',
    loadChildren: () =>
      import('./admin-dashbaord/admin-dashbaord.module').then(
        (m) => m.AdminDashbaordModule
      ),
 }
…
If you’d like to learn more about it, go to this article.
The main benefit of using lazy load is increased performance.
Use SCAM module schema
There’s a relatively new idea to organize your module in the SCAM (Single Component Angular Modules) schema. In short, it promotes creating a module for each component. This helps to avoid all the issues that come up while using NgModules — for example, troublesome refactoring.
SCAM will become especially important with the incoming implementation of the standalone components, which has a great chance of becoming the hottest topic in Angular next year. You can check out the whole discussion in the official Angular repository.
The main benefits of using SCAM module schema are:
- Easy-to-follow structure of the project,
- Being ready to transfer components into standalone ones when they’re implemented.
Write comments only when it makes sense
Putting comments into the code is a good practice, but only when they convey a useful message to the reader later on. The comments describing what the code does aren’t good comments. Well–written code should explain itself, without the need for additional descriptions.
Good comments either should describe how and when to use a part of the code (many libraries have docs comments for their functions, including parameters) or describe unusual structures, like atypical bug fixes for older browsers.
The main benefits of writing comments only when it makes sense are:
- Easier to understand code,
- Happy developers 😊.
Write tests
Writing tests may seem like an unnecessary overhead but it’s a vital practice for all developers. Local unit tests and final automated end-to-end tests are valuable assets to detect bugs early. Writing tests may take some of your time at first, but it will pay off in the future — for example, when you’ll have to compare old and new functionalities after applying changes.
So don’t neglect your tests!
The main benefits of writing tests are:
- Faster development process,
- Reduced number of bugs,
- Enabled Test–Driven Development.
Don’t forget about DRY, KISS, SOLID, YAGNI, BDUF, SOC, and other wise acronyms
Since programming became really popular, the creation of code writing principles was inevitable. These principles are general enough to be applied to all programming languages, so Angular, which is written in TypeScript, can also make use of them.
Because all the principles are rather long, developers created acronyms for them. The most popular ones are:
- DRY (Don’t Repeat Yourself)
- KISS (Keep It Stupid Simple)
- SOLID
- S — Single–Responsibility Principle
- O — Open–Closed Principle
- L — Liskov Substitution Principle
- I — Interface Segregation Principle
- D — Dependency Inversion Principle
- YAGNI (You Aren’t Gonna Need It)
- BDUF (Big Design Up Front)
- SOC (Separation Of Concerns)
Summary: Angular best practices
All these best practices described didn’t show up out of anywhere — they’re the result of the long and hard work of Angular developers. They’ve been proven many times before and are extensively battle-tested.
So don’t reinvent the wheel. Make use of all the accumulated knowledge that came before you and achieve better results, faster.
Happy coding! 😊